Friday, December 30, 2011

Harvesting Rainwater: How to Make a Rain Barrel


************************************************************************
Rain  Barrels  will be  a valuable source  of  water both  for  conservation/sustainability and  for  survival if the  need  arises.  I have  had  a series of  rain barrels that  I have  collected. A  total of  12 – 30 gallon  containers that  will collect up to  360 gallons of  water in a  good   downpour.  As long  as it  rains I  will have  plenty of  water to  purify  for  drinking , bathing and  cooking  needs.  Using t he  greywater recovery  technique  I  will also have  plenty of  water  for  my  garden.  It’s a  win/win  situation.
*************************************************************************

Harvesting Rainwater: How to Make a Rain Barrel

From harvesting rainwater in a rain barrel to composting your kitchen and yard waste in a compost bin, you can greatly increase your self-reliance by undertaking a few simple DIY projects.
By Betsy Matheson
May 12, 2011


Rainwater that is collected in a rain barrel before it hits the ground is free of many contaminants that water picks up as it filters through soil. This soft, warm (and free) water is perfect for plants, lawns, and many other outdoor applications. DIY Projects for the Self-Sufficient Homeowner provides a step-by-step plan to help you build a rain barrel, as well as many other DIY projects to increase your self-reliance.
COVER: CREATIVE PUBLISHING INTERNATIONAL
The following is an excerpt from DIY Projects for the Self-Sufficient Homeowner by Betsy Matheson (Creative Publishing International, 2011). This handy book is your first step toward participating in the fast-growing self-sufficiency movement. Even if you live on a small urban lot, you can take steps to gain a little more control over things you consume using the plans in this book. This excerpt is from Chapter 1, “Collecting Rainwater.”
Practically everything around your house that requires water loves the natural goodness that’s provided with soft rainwater. When you know how to make a rain barrel, you can begin harvesting rainwater to irrigate your garden or lawn, water your houseplants, or top off swimming pools and hot tubs. A ready supply of rainwater is also a reliable stand-by for emergency use if your primary water supply is interrupted.
Collecting rainwater runoff in rain barrels can save thousands of gallons of tap water each year. A typical 40-by- 40-foot roof is capable of collecting 1,000 gallons of water from only one inch of rain. A large rainwater collection system that squeezes every drop from your roof can provide most — or sometimes all — of the water used throughout the home, if it’s combined with large cisterns, pumps, and purification processing.
Sprinkling your lawn and garden can consume as much as 40 percent of the total household water use during the growing season. A simple rain barrel system that limits collected water to outdoor (nonpotable) use only, like the rain barrels described on the following pages, can have a big impact on the self-sufficiency of your home, helping you save on utility expenses and reducing the energy used to process and purify water for your lawn and garden. Some communities now offer subsidies for rain barrel use, offering free or reduced-price barrels and downspout connection kits. Check with your local water authority for more information. Get smart with your water usage, and take advantage of the abundant supply from above.

Rain Barrels

Rain barrels, either built from scratch or purchased as a kit, are a great way to irrigate a lawn or garden without running up your utilities bill. The most common systems include one or more rain barrels (40 to 80 gallons) positioned below gutter downspouts to collect water runoff from the roof. A hose or drip irrigation line can be connected to spigot valves at the bottom of the rain barrel. You can use a single barrel, or connect several rain barrels in series to collect and dispense even more rainwater.
Plastic rain barrel kits are available for purchase at many home centers for around $100. If kit prices aren’t for you, a rain barrel is easy to make yourself for a fraction of the price. The most important component to your homemade barrel is the drum you choose.

Obtaining a Rain Barrel

Practically any large waterproof container can be used to make a rain barrel. One easily obtained candidate is a trash can, preferably plastic, with a snap-on lid. A standard 32-gallon can will work for a rain barrel, but if you can find a 44-gallon can choose it instead. Although wood barrels are becoming more scarce, you can still get them from wineries. A used 55-gallon barrel can be obtained free or for a small charge from a bulk food supplier. Most 55-gallon barrels today are plastic, but some metal barrels are still floating around. Whatever the material, make sure the barrel did not contain any chemical or compound that could be harmful to plants, animals, or humans. If you don’t know what was in it, don’t use it. Choose a barrel made out of opaque material that lets as little light through as possible, reducing the risk of algae growth.
A barrelful of water is an appealing breeding ground for mosquitoes and a perfect incubator for algae. Filters and screens over the barrel opening should prevent insect infestation, but for added protection against mosquitoes add one tablespoon of vegetable oil to the water in the barrel. This coats the top surface of the stored water and deprives the larvae of oxygen.

How to Make a Rain Barrel

Tools and Materials
  • Barrel or trash can
  • Drill with spade bit
  • Jigsaw
  • Hole saw
  • Barb fitting with nut for overflow hose
  • 1 1/2″ sump drain hose for overflow
  • 3⁄4″ hose bibb or sillcock
  • 3⁄4″ male pipe coupling
  • 3⁄4″ bushing or bulkhead connector
  • Channel-type pliers
  • Fiberglass window screening
  • Cargo strap with ratchet
  • Teflon tape
  • Silicone caulk
  1. Cut a large opening in the barrel top or lid. Mark the size and shape of your opening — if using a bulk food barrel, mark a large semi-circle in the top of the barrel. If using a plastic garbage can with a lid, mark a 12-inch diameter circle in the center of the lid. Drill a starter hole, and then cut out the shape with a jigsaw (see Image Gallery).
  2. Install the overflow hose. Drill a hole near the top of the barrel for the overflow fitting. Thread the barb fitting into the hole and secure it to the barrel on the inside with the retainer nut and rubber washer (if provided). Slide the overflow hose into the barbed end of the barb elbow until the end of the hose seats against the elbow flange (see Image Gallery).
  3. Drill the access hole for the spigot (either a hose bibb or sillcock, brass or PVC). Tighten the stem of the sillcock onto a threaded coupling inserted into the access hole. Inside the barrel, a rubber washer is slipped onto the coupling end and then a threaded bushing is tightened over the coupling to create a seal. Apply a strip of Teflon tape to all threaded parts before making each connection. Caulk around the spigot with clear silicone caulk.
  4. Screen over the opening in the top of the barrel. Lay a piece of fiberglass insect mesh over the top of the trash can and secure it around the rim with a cargo strap or bungee cord that can be drawn drum-tight. Snap the trash can lid over the top. Once you have installed the rain barrel, periodically remove and clean the mesh.

How to Install a Rain Barrel

Whether you purchase a rain barrel or make your own from scratch or a kit, how well it meets your needs will depend on where you put it and how it is set up (see Image Gallery). Some rain barrels are temporary holding tanks that store water runoff just long enough to direct it into your yard through a hose and drip irrigation head. Other rain barrels are more of a reservoir that supplies water on-demand by filling up watering cans or buckets. If you plan to use the spigot as the primary means for dispensing water, you’ll want to position the rain barrel well off the ground for easy access (raising your rain barrel has no effect on water pressure).
In addition to height, other issues surrounding the placement of your rain barrel (or rain barrels) include the need to provide a good base, orientation of the spigot and overflow, the position relative to your downspouts, and how to link more than one rain barrel together. Tip: Wherever possible, locate your rain barrel in a shaded area. Sunlight encourages algae growth, especially in barrels that are partially translucent.
Tools and Materials
  • Drill/driver
  • Screwdriver
  • Hack saw
  • Rain barrel
  • Hose & fittings
  • Base material (pavers)
  • Downspout adapter and extension
  • Teflon tape
  1. Select a location for the barrel under a downspout. Locate your barrel as close to the area you want to irrigate as possible. Make sure the barrel has a stable, level base.
  2. Install the spigot. Some kits may include a second spigot for filling watering cans. Use Teflon tape at all threaded fittings to ensure a tight seal. Connect the overflow tube, and make sure it is pointed away from the foundation.
  3. Cut the downspout to length with a hacksaw. Reconnect the elbow fitting to the downspout using sheet-metal screws. Attach the cover to the top of the rain barrel. Some systems include a cover with porous wire mesh, to which the downspout delivers water. Others include a cover with a sealed connection (next step).
  4. Link the downspout elbow to the rain barrel with a length of flexible downspout extension attached to the elbow and the barrel cover.
  5. Variation: If your barrel comes with a downspout adapter, cut away a segment of downspout and insert the adapter so it diverts water into the barrel.
  6. Connect a drip irrigation tube or garden hose to the spigot. A Y-fitting will let you feed the drip irrigation system through a garden hose when the rain barrel is empty.
  7. If you want, increase water storage by connecting two or more rain barrels together with a linking kit, available from many kit suppliers.

Thursday, December 29, 2011

Low-Cost Greywater Irrigation


**********************************************************************************

This is  an  awesome idea that  I use  at  home.  Although,  instead of placing  the  bucket underneath the  sink and  messing with the  piping  to  collect the  water.  I simply  use dish  totes ( the kind they  use  in restaurants for  busing  tables).  I  place  them in the  sink with  hot  soapy water and  the other  with  hot rinse  water.  I  wash the  dishes in one tub and  then  rinse  them in the other.  No  water is  wasted and the  water from the  tubs are  transferred to the 5  gallon  bucket when the dishes  are  done.  I  wanted  to  share  it  with  you.  The  more people  start  to  conserve  water  then  more   fresh  water  there  sill be.  Not  to  mention learning to  conserve  water  so that  you  already  know  what  to  do and  how  to  do it   when a  disaster strikes and  your life  will depend on  your  ability to  conserve.
It  is important to make  sure that the  detergent  you  use  is  phosphate free and  biodegradable.  So that it is  safe for your  plants and the   environment.
**********************************************************************************

Low-Cost Greywater Irrigation

Use greywater from your kitchen sink to water your vegetable garden with this simple irrigation system.
By Dana Cohen
August/September 2009
Read more: http://www.motherearthnews.com/Do-It-Yourself/Graywater-Irrigation-Low-Cost.aspx#ixzz1hu7XKqtN

A simple, portable watering system for a small garden.
DANA COHEN
I’ve always wanted to do more with greywater (also spelled graywater, gray water and grey water) — waste water from dishwashing, laundry and bathing — but as a renter, I wanted to invest my money and energy in a way that was more portable than traditional systems. I started by looking into rain barrels as a way to cache water and was amazed at how expensive they were. Then I found a few 5-gallon buckets at a construction site, and came up with this simple greywater setup that has worked well for me for the past two summers.
The setup is a 5-gallon bucket with a tap inserted, hooked up to a commercial drip irrigation system in my raised garden beds. I use one bucket per 2-foot-square bed.I clean the buckets, drill a hole, and insert a garden-hose-sized tap. To keep the tap from leaking, I cover the thread with Teflon tape, put a washer on the inside of the bucket and use a plastic hose coupler to secure the tap. I hook this up to the drip irrigation system.The drip irrigation kit was the most expensive part of this system at about $25. The tap and accessories totaled a little less than $6. I live in northern Arizona, and during the heat of high summer I use a full bucket a day in my sunniest bed.The source of the greywater is the leftover water from washing dishes, which I collect in another 5-gallon bucket I keep by the sink.
Dana Cohen
Fredonia, Arizona
Another  route that  some people  are taking  is  the  grey  water  diversion method.  This entails rerouting  the flow  of  grey water  from  main  sewer piping  established  by the cities and  counties to ensure that  the  grey water  can  be  utilized in a  more  efficient  manner.  Although  in some  States this is  illegal  many  are opting to the  clandestine  retrofitting to fill a need  for  conservation  and the  logical  and  ethical stewardship of  natural  resources and   our planet.

Saturday, December 24, 2011

Water


Water is  very  important to  survival.  It  is necessary for hydration,  for  hygiene,  for sanitation ; keeping us  safe from illness.  Water is of very important to all living things; in some organisms, up to 90% of their body weight comes from water. Up to 60% of the human body is water, the brain is composed of 70% water, and the lungs are nearly 90% water. Lean muscle tissue contains about 75% water by weight, as is the brain; body fat contains 10% water and bone has 22% water. About 83% of our blood is water, which helps digest our food, transport waste, and control body temperature. Each day humans must replace 2.4 litres of water, some through drinking and the rest taken by the body from the foods eaten.
A  human  being can  survive anywhere  from  2  to 10 days  depending on the  temperature.  The  higher  the  temperature  the  shorter to  survival time.  Although, no matter  what the  temperature the  human  body  requires  the  same amount  of water  to  stay  healthy regardless of  how  hot or  how  cold  it is.  The  reason  is  simply that the  body  requires it  to remove  toxins and  to regulate  body  temperature.
The  American  Red Cross  says :
After an emergency, such as a flood, hurricane, or earthquake, drinking water may not be available or safe to drink. As a result, you may have to find a source of safe drinking water or know how to treat your water for use in certain activities, such as drinking, making ice, washing hands, and brushing teeth. The following information will tell you how to plan for treating and storing your water in the event of an emergency.

Prepare an Emergency Water Supply

  • Store at least 1 gallon of water per day for each person and each pet. You should consider storing more water than this for hot climates, for pregnant women, and for persons who are sick.
  • Store at least a 3-day supply of water for each person and each pet (try to store a 2-week supply if possible).
  • Observe the expiration date for store-bought water; replace other stored water every six months.
  • Store a bottle of unscented liquid household chlorine bleach to disinfect your water and to use for general cleaning and sanitizing.

Water Containers (Cleaning and Storage)

Unopened commercially bottled water is the safest and most reliable emergency water supply.
Use of food-grade water storage containers, such as those found at surplus or camping supply stores, is recommended if you prepare stored water yourself.
Before filling with safe water, use these steps to clean and sanitize storage containers:
  1. Wash the storage container with dishwashing soap and water and rinse completely with clean water.
  2. Sanitize the container by adding a solution made by mixing 1 teaspoon of unscented liquid household chlorine bleach in one quart of water.
  3. Cover the container and shake it well so that the sanitizing bleach solution touches all inside surfaces of the container.
  4. Wait at least 30 seconds and then pour the sanitizing solution out of the container.
  5. Let the empty sanitized container air-dry before use OR rinse the empty container with clean, safe water that already is available.
Avoid using the following containers to store safe water:
  • Containers that cannot be sealed tightly
  • Containers that can break, such as glass bottles
  • Containers that have ever been used for any toxic solid or liquid chemicals (includes old bleach containers)
  • Plastic or cardboard bottles, jugs, and containers used for milk or fruit juices
For proper water storage,
  • Label container as “drinking water” and include storage date.
  • Replace stored water that is not commercially bottled every six months.
  • Keep stored water in a place with a fairly constant cool temperature.
  • Do not store water containers in direct sunlight.
  • Do not store water containers in areas where toxic substances such as gasoline or pesticides are present.

Make Water Safe

Water often can be made safe to drink by boiling, adding disinfectants, or filtering.
IMPORTANT: Water contaminated with fuel or toxic chemicals will not be made safe by boiling or disinfection. Use a different source of water if you know or suspect that water might be contaminated with fuel or toxic chemicals.

Boiling

If you don’t have safe bottled water, you should boil water to make it safe. Boiling is the surest method to make water safer to drink by killing disease-causing organisms, including viruses, bacteria, and parasites.
You can improve the flat taste of boiled water by pouring it from one container to another and then allowing it to stand for a few hours, OR by adding a pinch of salt for each quart or liter of boiled water.
If the water is cloudy,
  • Filter it through a clean cloth, paper towel, or coffee filter OR allow it to settle.
  • Draw off the clear water.
  • Bring the clear water to a rolling boil for one minute (at elevations above 6,500 feet, boil for three minutes).
  • Let the boiled water cool.
  • Store the boiled water in clean sanitized containers with tight covers.
If the water is clear,
  • Bring the clear water to a rolling boil for one minute (at elevations above 6,500 feet, boil for three minutes).
  • Let the boiled water cool.
  • Store the boiled water in clean sanitized containers with tight covers.

Disinfectants

If you don’t have safe bottled water and if boiling is not possible, you often can make water safer to drink by using a disinfectant such as unscented household chlorine bleach or iodine. These can kill most harmful organisms, such as viruses and bacteria, but are not as effective in controlling more resistant organisms such as the parasites Cryptosporidium and Giardia.
To disinfect water,
Filter it through a clean cloth, paper towel, or coffee filter OR allow it to settle.
Draw off the clear water.
To use bleach, add 1/8 teaspoon (or 8 drops; about 0.625 milliliters) of unscented liquid household chlorine (5-6%) bleach for each gallon of clear water (or 2 drops of bleach for each liter or each quart of water),
Stir the mixture well.
Let it stand for 30 minutes or longer before you use it.
Store the disinfected water in clean sanitized containers with tight covers.
To use iodine, follow the manufacturer’s instructions.
Chlorine dioxide tablets are another disinfectant that now is available in some outdoor stores. This disinfectant has proven to be effective against pathogens, including Cryptosporidium, if the manufacturer’s instructions are followed.

Filters

Many portable water filters can remove disease-causing parasites such as Cryptosporidium and  Giardia from drinking water. If you are choosing a portable water filter, try to pick one that has a filter pore size small enough to remove both bacteria and parasites. Most portable water filters do not remove viruses.
Carefully read and follow the manufacturer’s instructions for the water filter you intent to use. After filtering, add a disinfectant such as iodine, chlorine, or chlorine dioxide to the filtered water to kill any viruses and remaining bacteria.

Finding Emergency Water Sources

Alternative sources of clean water can be found inside and outside the home. DO NOT DRINK water that has an unusual odor or color, or that you know or suspect might be contaminated with fuel or toxic chemicals; use a different source of water.
The following are possible sources of water:

Inside the Home

  • Water from your home’s water heater tank
  • Melted ice cubes made with water that was not contaminated
  • Water from your home’s toilet tank (not from the bowl), if it is clear and has not been chemically treated with toilet cleaners such as those that change the color of the water
  • Liquid from canned fruit and vegetables
Listen to reports from local officials for advice on water precautions in your home. It may be necessary to shut off the main water valve to your home to prevent contaminants from entering your piping system.
Water from sources outside the home must be treated.  DO NOT DRINK water that has an unusual odor or color, or that you know or suspect might be contaminated with fuel or toxic chemicals; use a different source of water.
Water to be continued…………………

Friday, December 23, 2011

A wake up call for how we view the possibilities of violence during or after a disaster

We want to believe in the inherent goodness and decency in people. However, is it always within that persons control? Can we understand that sometimes inherently good and decent people can crack and do despicable things?

I stumbled across this BBC documentary that I found very interesting . I thought I would share it with all of you to put in perspective my warnings of security and self defense.

************************************************************************************************************
Uploaded by on Oct 27, 2011

What makes ordinary people commit extreme acts of violence?
In a thought-provoking and disturbing journey, Michael Portillo investigates one of the darker sides of human nature. He discovers what it is like to inflict pain and is driven to the edge of violence himself in an extreme sleep deprivation study.

He meets men for whom violence has become an addiction and ultimately discovers that each of us could be inherently more violent than we think, and watches a replication of one of the most controversial studies in history, the Milgram study. Will study participants be willing to administer a seemingly lethal electric shock to someone they think is an innocent bystander?

How Violent are You? - BBC Horizon


Wednesday, December 21, 2011

A list of Essentials for a Survival Situation


Water -  storage , safety and identifying possible  sources.
Food – determining  the  best  choices for  a  survival situation and learning  how  to store and prepare them.
First Aid – assessing needs and acquiring necessary knowledge to make a difference in case  of  an  emergency.   It  could mean  the  difference  between  life  and  death.
Securing your  location from  threats animal, human, biological or radioactive.
Gardening assessing  your  family’s  needs, establishing  and maintaining a garden.  Where do you  get the  seeds ,  what  kind  of  seeds, and  how  to save them once  your  garden is  established.
Hygiene and Sanitation – determining personal needs and  dealing with the lack  of indoor plumbing.
Hunting, Fishing and  Trapping -  determining your  family’s  needs/limitations, tools  and  equipment  needed and some  techniques to practice  for  when the time  comes.
Power and  lighting  needs – determining the  best  methods available for  power, lighting  and  what  you  will need  to look for.
Fuels – determining  what  your  family’s needs will be  for  cooking, operating your car or a  generator and  heating your shelter during  cold  weather.
Tools – essential  tools that  you  will need  to be  able to construct, repair, garden, etc.
Books/Instructional Booklets – information at  your  fingertips, quick reference  anytime  you  need it.
Bartering-  discussing  possible items that would  be a  good  idea  to  stock up on to facilitate transactions for needed or  wanted items/supplies.

Monday, December 19, 2011

Something Wicked This Way Comes

Hello,  I have  noticed  that there  are  many  survivalist sites out there.  However, by the  same  token  I  have also  noticed that  many  people  are  put off by  them  because there is a  stigma  to  the   word  Prepper or  Survivalist.  I  think that  preparing  for  disasters, natural or  man  made is  of the  essence.  So I  would  like to  present  my ideas  in a  more  appealing  manner  for the  comfort of  those  who shy  away  from the  labels..
I  will be  presenting  a series of blogs  with  information  and  planning advice  that  could  very  well appeal to you.  Thereby, allowing  you  to see the  bigger  picture  about  what  could  very  well  be  coming down the pike, so  to  speak.
I  welcome all  constructive  feedback and  questions.  After all,  this is  about  our helping  each  other to  discover what  we  can  do to keep  ourselves  and our  loved  ones  safe.  Please  feel free to  ask .  All  legitimate  inquiries  will be  addressed to the  best  of my  abilities.
IF there  were a disaster in  your  area  tomorrow  would you  be  prepared  to  take care of  yourself and your family with the  skills and   supplies  you  presently  have in  your  home?
I do  not  by  any stretch of  the imagination  consider myself  an  alarmist , a doomsday-er, an  end of the  world-er or  any  other labels  there  may  exist  out  there  and I am  sure there  are  plenty.  What  I am  is a  single  mom  who lived  in Florida  for  25  years  and  am well acquainted  with  what  happens to  people   when they are  not  prepared  for a  disaster.  Now  you  would  think  that  in a  state that is  known for  hurricanes people  would understand that it is not  silly  to prepare before  hurricane  season is  upon  them.  We  were  without  electricity for  3  weeks  after  hurricane  Andrew, 2  weeks  after  hurricane  Katrina and  another 3 weeks after hurricane  Wilma.  On a limited  income ,  how well  do you think I  would have  been  able  to  feed  my family if I  had not prepared and had to  depend  on buying our food from restaurants kept running with  generators?
Another thing people fail  to understand is this: Hurricanes can be  predicted to a  certain  degree.  They  follow   tropical  storms until it  shows  signs of  strengthening, as  they  are  slow  moving time  is on our  side.  Even  their trajectory  can  be  planned  out  to a  certain  degree.  Their  estimated  arrival  can  also  be tracked.  Do you  really  believe a  tsunami, monster  tornado  or an  earthquake can  be tracked and  predicted  to  that  extent?  So  without  warning how much  time do you have  to prepare?  Do  you  believe these natural  disasters  can’t  disrupt  our  utilities and  transport  for longer than  3  weeks?  The  reality  of the  matter is  quite the contrary.  The  single  most  intelligent  thing that anyone  can do is  to  prepare.  When that  hurricane is  announced  and  it’s  arrival  date  is  made  public  then the  panic  sets  in;  When that  earthquake  hits or that  tornado has  passed.   People  rush  to the  supermarkets.  Those  who get there first will be able to  find  all they need.  However,  the ones  who  came a  bit  later or those  who did  not  prepare in advance will find  empty  shelves.  How much  advance  notice  does the public  receive  for an  earthquake, tornado or  tsunami?  You  see  where  I am  going  with this?  Did  you  know  that  all  supermarkets  across the  US   have about  of  3 to 4  days worth of  supplies on  location?  Without  transport  from  regional warehouses they  have only  what is  on the  shelves and in their  backroom storage.  Now  without water,  bread, batteries, canned  goods, etc. in the  supermarket what  will  you do?
No one  can  deny  that  we  are  headed  for  hard  times with the  economy the  way  it is.  It’s  not like  I  am  presenting  an unheard of  scenario.  How  many  have  lost  their  jobs and  ended  up  homeless?  How  many people  are  one paycheck away  from  ending  up on the  streets?  We  have all  read  about the  great  depression and I dare  say  we  all understand that  it  occurred  right  here  at  home and  not  some  far  off  land.  The  hardships, the  hunger, and the total despair of those  who lived  that  era of our  Nation’s  history.
As  our  society continues  on  the  road  of  development and  modernization technology progresses and the chains of interdependency become more ingrained  within us.  Our food,  our clothing all the  comforts  we use on a daily  basis  require transport   either  from  other  states  far  away  or  other  countries.   Through the  web  of globalization  we  have  gone  from a  country  of  production and  manufacture  to  one  of  consumption.  The  truth  is that  very  little  is now  made  here in the  US. Therefore it  stands  to reason  that if  something  happens  and  these modes  of  transport  are interrupted  for any  reason  so will the  availability  of  these  products.  This is  not  me  being  an  alarmist.  Quite the  contrary it  is  necessary  for  us  to be  realists and  see things  logically.  Think  about it .  Where  do  your  fruit ,  your  vegetables, your clothing ,  etc. come  from?  I   encourage  you  to  start  taking a  good  look at the  labels and  you  will see the  truth  of  my   words.  All it  would  take to  disrupt  the  transport  that  connects  us  to  our daily  essential  products  is an interruption in the  availability  of  fuel or the destruction of main  highways  and  streets.  Impossible you  say?  Look  around  you.  How many  freak  storms  and  weather  phenomenon  have  you  read  about  in the  newspaper  or  seen on the  news?  Hurricanes, tornadoes, earthquakes, nuclear plant accidents, tsunamis not to mention  freak  waves.  Granted  many of these  monster  storms   and  earthquakes  have  occurred in other  countries.  Is  it  so  crazy  to  consider that it  could  also happen  here in the  US?  Starting to get the  picture?
Dealing  With Reality
Human Nature – What  are people capable of:  In  Florida during  the onset of  a hurricane  it could very  easily  be  seen  who the  dangerous people  would be  just  by the  way  they  would push  people  aside and  fight  with  someone for the last bottle  of  water on the shelf.  I know the  answer to this  question  but  I  would like to ask  you.  Do you  know  what  your  neighbor  is  capable of  when a devastating  panic  comes into play and there  is  no food  to be  had?  Just  take a look at  what happens  during a  Black Friday  Sale.  We have all seen the  videos, the  news paper  articles  or the tv/radio broadcasts of  people hurting  each  other  and  fighting  over  products  that  are  on sale and  they  just  have to  have.  Imagine what these people would be like in a  life  or  death  situation where there is no food  or  water  available.  Big  cities will be  worse due to the  high  concentration  of  people and the lack of  resources  once transport  is interrupted  for any  reason.
Be  Practical:  Understand the  risks  you  take  by  not  preparing  properly.  Take  measures  to  protect  yourself and  your  family.  Stock  up on  food  and supplies to make  sure  that  all are assured of food  water  and  first  aid when they need them.  Think  about  family  members  who have  not  prepared.  What  will happen  when  they have  no  food  or  water?  Will  you  be able to  share  what  you  have   to insure that they  too are taken  care of?  What  about  your neighbor  or that  little  old  lady  across the  street  who has  no one?  What  about if you  or  your significant  other  lose  your  job.  Do  you realize that having a  back up food  supply  could  help  tide  you  over  until  things  get  better?
Will you be  ready  to  defend  yourself  and your family?  Just  look  at  what  happens  during  a  black  out in  NYC  or a  riot  in  LA.  Learn  that  in  moments of  great  turmoil  some people  resort  to  violence.  It is a  proven  fact not my  own   wild imaginings.  Think about it.  Not  everyone is  willing to  go  out  and buy a  gun.  However,  safety and the protection of  your  family  is of  the  utmost  importance.  What  will you  do  in a  moment  such  as  this and  how  will you  protect them?  I  leave the  details  to  your  imagination  and  your  conscience.  As the  saying   goes, ”An ounce of  prevention is worth a  pound  of  cure.”   No  truer  words  have  ever been spoken.
Alone vs. a  group:  The  old  adage  says  clearly  that  there  is strength  in  numbers.   Effective security means having at least two families to provide security at all times.  This  can  include close  neighbors, family  and  friends.  However, one must  take into account that  for every individual added there  will be  another mouth to feed.  Effectively  adding  people  to  ones  group  calls  for adequate supplies and  resources.  The amounts having a  direct bearing on the  amount  of  people the  group can sustain.
The  enormity  of  getting a  family  prepared  can  be  overwhelming.  Take  a moment to ponder  the  fact  that  most  people  are not  even considering  the  need to prepare .  That already  puts  you  ahead  of the  curve.  Financial issues are  another  worry.  My recommendation is start out  slow.  Whenever you  go  shopping  buy a few  extra  items that  will be  designated  to the  food  supply. A  few cans  here  a  couple  of  bags  there  and  in a  few  weeks  you  will start  to see  your supply  grow.  One step at a  time  is  the  best  way  to  insure success.
Take  a good long  look at  your  pantry , be  totally  honest  with  yourself .  Will  you and  your family  survive  with  what  you  have  there if  you  are without a working infrastructure for  3  weeks or  more,  like  we  did  in  Florida  after hurricane Andrew?
Let’s  start by making  a practical list of the  essentials  we  will be needing in  case of an emergency such as  the ones  I  have  mentioned.  On my  next blog  I  will  be starting the  lists and the pertinent information I  have to  give  on  each   subject.
See you  next  time………     :)

Friday, December 2, 2011

Storing Water Continued ,Plus A Few Neat Tricks


WATER AND SALT REQUIREMENTS
Painful thirst has been experienced by very few Americans. We take for granted that we will always have enough water to drink. Most of us think of “food and water” in that order, when we think of survival essentials that should be stored. But if unprepared citizens were confined in a shelter by heavy fallout, they soon would realize that they should have given first priority to storing adequate water.
For the kidneys to eliminate waste products effectively, the average person needs to drink enough water so that he urinates at least one pint each day. (When water is not limited, most people drink enough to urinate 2 pints. Additional water is lost in perspiration, exhaled breath, and excrement.) Under cool conditions, a person could survive for weeks on 3 pints of water a day if he eats but little food and if that food is low in protein. Cool conditions, however, would be the exception in crowded belowground shelters occupied for many days. Under such circumstances four or five quarts of drinking water per day are essential in very hot weather, with none allowed for washing. For a two-week shelter stay, 15 gallons per person should be stored in or close to a shelter. This amount usually would provide for some water remaining after two weeks, to prevent thirst in case fallout dangers were to continue.
In a 1962 Navy shelter occupancy test lasting two weeks, 99 sailors each consumed an average of 2.4 quarts (2.3 liters) of water per day.15 The test was conducted in August near Washington, D.C.; the weather was unseasonably cool. The shelter was not air-conditioned except during the last two days of the test.
When one is sweating heavily and not eating salty food, salt deficiency symptoms especially cramping are likely to develop within a few days. To prevent this, 6 or 8 grams of salt (about 1/4 oz, or 1/2 tablespoon) should be consumed daily in food and drink. If little or no food is eaten, this small daily salt ration should be added to drinking water. Under hot conditions, a little salt makes water taste better.
CARRYING WATER                       
Most families have only a few large containers that could be used for carrying water to a shelter and storing it in adequate amounts for several weeks. Polyethylene trash bags make practical expedient water containers when used as waterproof liners inside smaller fabric bags or pillowcases. (Plastic bags labeled a& being treated with insecticides or odor-controlling chemicals should not be used.) Figure 8.1 shows a teenage boy carrying over 10 gallons (more than 80 pounds) of water, well balanced front and back for efficient packing. Each of his two burlap bags is lined with two 20-gallon polyethylene trash bags, one inside the other. (To avoid possible pinhole leakage it is best to put one waterproof bag inside another.)
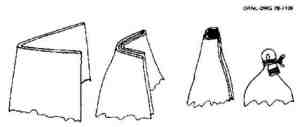
To close a plastic bag of water so that hardly any will leak out, first spread the top of the bag until the two inner sides of the opening are together. Then fold in the center so that the folded opening is 4 thicknesses, and smooth (see Fig. 8.2). Continue smoothly folding in the middle until the whole folded-up opening is only about 1-1/2 inches wide. Then fold the top of the bag over on itself so the folded-up opening points down. With a strip of cloth or a soft cord, bind and tie the folded-over part with a bow knot, as illustrated.
Book Page: 67
Fig. 8.1. Carrying 80 pounds of water in two burlap bags, each lined with two larger plastic trash bags, one inside the other. (Photograph)

Fig. 8.2. Folding and tying the mouth of a water-filled plastic bag. (Illustration)

For long hikes, it is best to tie the water-holding plastic bags so that the openings ‘are higher than the water levels inside.
To transport this type of expedient water bag in a vehicle, tie a rope around the fabric outer bag near its opening, so that the rope also encircles and holds the plastic liner-bags just below their tied-shut openings. The other end of this rope should then be tied to some support, to keep the openings higher than the water level.
To use two fabric bags or pillowcases to carry a heavy load of water contained in larger plastic liner- bags connect the two fabric bags as shown in Fig. 8.1.
A small pebble, a lump of earth, or a similar object should be tied inside the opening of each bag before the two are tied together, to hold them securely. The bag that is to be carried in front should have the pebble tied about 4 inches further down from the edge of its opening than the pebble tied in the bag to be carried in back. This keeps the pebbles from being pressed against the carrier’s shoulder by a heavy load.
A pair of trousers with both legs tied shut at the bottoms can be used to carry a balanced load if pillowcases or other fabric bags are not at hand. Such a balanced load can be slung over the shoulder with the body erect and less strained than if the same weight were carried in a single bag-like pack on the back. However, trouser legs are quite narrow and do not provide room to carry more than a few gallons.
To prevent water from slowly leaking through the tied-shut openings ofplastic bags, the water levels inside should be kept below the openings.
STORING WATER
When storing expedient water bags in a shelter, the water levels inside should be kept below the openings.
Not many expedient shelters would be large enough to store an adequate volume of water for an occupancy lasting two or more weeks. Plastic-lined storage pits, dug in the earth close to the shelter, are dependable for storing large volumes of water using cheap, compact materials.
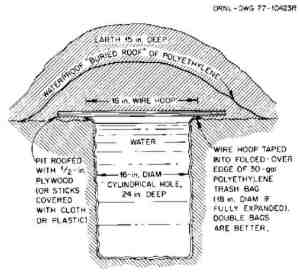
Fig. 8.3. Vertical section of cylindrical water storage pit lined with two 30-gallon waterproof plastic bags. This pit held about 20 gallons. (Illustration) ORNL- DWG 77- 0423R

Book Page: 68
Figure 8.3 shows a cylindrical water-storage pit dug so as to have a diameter about two inches smaller than the inflated diameter of the two 30-gallon polyethylene trash bags lining it (one bag inside the other). Before a plastic bag is placed in such a pit, the ends of roots should be cut off flush to the wall with a sharp knife, and sharp rocks should be carefully removed.
The best way to keep the upper edges of the pit lining bags from slipping into the pit is shown in Fig. 8.3: Make a circular wire hoop the size of the opening of the bag, and tape it inside the top. In firm ground, the upper edges of double bags have been satisfactorily held in place simply by sticking six large nails through the turned-under edges of the bags and into the firm earth.
Figure 8.3 shows how to roof and cover a water storage pit so as to protect the water. The “buried roof” of waterproof material prevents any contamination of the stored water by downward-percolating rainwater, which could contain bacteria or small amounts of radioactive substances from fallout. The thick earth cover over the flexible roofing gives excellent blast protection, due to the earth arching that develops under blast pressure. In a large Defense Nuclear Agency blast test, a filled water-storage pit of the size illustrated was undamaged by blast effects at an overpressure range which could demolish the strongest aboveground buildings (53 psi).
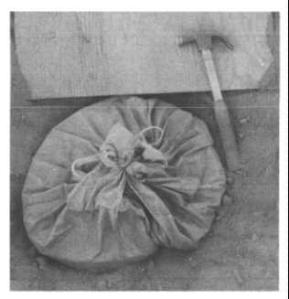
A simpler way to store water is illustrated in Fig.8.4. If the soil is so unstable that an unshored water storage pit with vertical sides cannot be dug, the opening of the bag (or of one bag placed inside another) can simply be tied shut so as to minimize leakage (see Fig. 8.4). Fill the bag with water, tie it, and place it in the pit. Then bury it with earth to the level of the water inside. A disadvantage of this method is leakage through the tied-shut openings due to pressure of loose earth on the bag. To lessen leakage, leave an air space between the filled bag and a roofing of board or sticks, so that the weight of earth piled on top of the roofing will not squeeze the bag. This storage method has another disadvantage: after the earth covering and the roof are removed, it is difficult to bail out the water for use because as water is bailed out, the loose surrounding earth moves inward and squeezes the bag above the lowered water level.
Fig. 8.4. These two 30-gallon polyethylene trash bags, one inside the other, held 16 gallons of water. They were undamaged by 50-psi blast effects while buried in dry, very light soil. The plywood roof and the earth placed over the water bag were removed before this picture was taken.

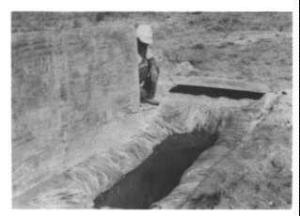
Fig. 8.5. Post-blast view of plastic-lined water storage pit undamaged at a 6.7-psi overpressure range. This pit held about 200 gallons.

Large volumes of water can be stored in plastic lined rectangular pits. In order to roof them with widely available materials such as ordinary ))-inch plywood or small poles, the pits should be dug no wider than 3 feet. Figure 8.5 pictures such a pit: 8 feet long, 27 inches wide, and 30 inches deep. It was lined with a 10-foot-wide sheet of 4-mil polyethylene. The edges of this plastic sheet were held in place by placing them in shallow trenches dug near the sides of the pit and covering them with earth.
Book Page: 69
Earth was mounded over the plywood roof to a depth of about 30 inches, with a “buried roof” of polyethylene. The earth cover and its “buried roof” were similar to the pit covering illustrated by Fig. 8.3. This rectangular pit contained about 200 gallons of water. No water leaked out after the pit had been subjected to blast effects severe enough to have flattened most substantial buildings. However, rectangular pits at higher overpressures failed, due to sidewall caving that caused leaks.
In a subsequent blast test by Boeing Aerospace Company, a plastic-lined water pit was undamaged at the 200-psi overpressure range. First a rectangular pit 4 ft. wide, 12 ft. long, and 2 ft. deep was dug. Then inside this pit a 2 x l0 x 2-ft. water-storage pit was dug, and lined with plastic film. After being filled full of water, the storage pit was covered with plywood, on which was shoveled 2 ft. of earth.
Plastic garbage cans are usually watertight; most used metal garbage cans are not. If thoroughly cleaned and disinfected with a strong chlorine bleach solution, watertight garbage cans can serve for emergency water storage, as can some wastebaskets. If new plastic film is available, it can be used as a lining to waterproof any strong box. To lessen the chances of the plastic being punctured, rough containers first should be lined with fabric.
If shelter is to be taken in or near a building, water trapped in hot water heaters and toilet flush tanks or stored in tubs might be available after an attack.
SIPHONING
Pouring water out of a heavy water-storage bag is inconvenient and often results in spillage. Dipping it out can result in contamination. If a tube or piece of flexible garden hose is available, siphoning (see Fig. 8.6) is the best way. A field-tested method is described below. To prevent the suction end of the tube from being obstructed by contact with the plastic liner of the bag, tape or tie a wire “protector” to the end, as pictured later in this section.
To start siphoning,’ suck on the tube until water reaches your mouth. Next fold over the tube near its end, to keep the tube full. Lower its closed end until it is near its position shown in Fig. 8.6. Then release your hold on the tube, to start siphoning.To cut off the water, fold over the tube and secure it shut with a rubber band or string.

Water can be siphoned from a covered water storage pit into a belowground shelter so that the siphon will deliver running water for weeks, if necessary. The Utah family mentioned earlier siphoned all they needed of the 120 gallons of water stored in a nearby lined pit. A field-tested method of siphoning follows:
1. Dig the water storage pit far enough away from the shelter so that the covering mounds will not interfere with drainage ditches.
2. Use a flexible tube or hose which is no more than 25 feet long. For a single family, a flexible rubber tube with an inside diameter of inch (such as surgical tubing) would be best. A flexible 2-inch hose of the type used with mobile homes and boats serves well. As indicated by Fig. 8.7, the tube should be long enough to extend from the bottom of the water pit to within about a foot of the shelter floor.
3. Make sure that the end in the water pit will not press against plastic and block the flow of water. This can be avoided by (1) making and attaching a wire “protector” to the end of the tube, as shown in Fig. 8.8, or (2) taping or tying the end to a rock or other object, to keep the end in the desired position.
4. Protect the tube by placing it in a trench about 4 inches deep. This small trench is best dug before roofing either the storage pit or the shelter. Be sure a roof pole or board does not crush the tube. Cover the tube with earth and tie it so that the end in the storage pit cannot be accidentally pulled out of position.
Book Page: 70
Fig. 8.7. Water siphoned into a belowground shelter. ORNL-DWG 78-11471
(Illustration)

Fig. 8.8. Two wire “protectors,” each made of two pieces of coathanger wire taped to a 1/2 inch flexible hose and a rubber tube. Shown on the right is a tube closed with a rubber band to stop a siphoned flow of water. (Illustration)

5. To start the flow of water into the shelter, hold the free end of the tube at about the height of the surface of the water in the storage pit, while pulling gently on the tube so that the part in the shelter is practically straight. Exhale as much breath as you can, then place the end of the tube in your mouth, and suck hard and long. (The longer the tube or hose and the larger its diameter, the more times you will have to suck to start the flow of water.)
6. Without taking the tube out of your mouth, shut it off airtight by bending it double near the end.
7. Exhale, straighten the tube, and suck again, repeating until you feel a good flow of water into your mouth while still sucking. Shut off the flow by bending the tube double before taking it out of your mouth.
8. Quickly lower the end of the tube (which is now full of water) and place the closed end in a container on the shelter floor. Finally, open the end to start the siphoned flow.
9. When you have siphoned enough water, stop the flow by bending the tube double. Keep it closed in the doubled-over, air-tight position with a strong rubber band or string, as shown in Fig. 8.8. To prevent loss of water by accidental siphoning, suspend the end of the tube a couple of inches higher than the surface of the water in the storage pit outside and close to where the tube comes into the shelter. (Despite precautions, air may accumulate in the highest part of the tube, blocking a siphoned flow and making it necessary to re-start the siphoning by repeating the sucking.)
DISINFECTING WATER
Water-borne diseases probably would kill more survivors of a nuclear attack than would fallout- contaminated water. Before an attack, if water from a municipal source is stored in expedient containers that could be unclean, it should be disinfected. For long storage, it is best to disinfect all water, since even a few organisms may multiply rapidly and give stored water a bad taste or odor. Properly disinfected water remains safe for many years if stored in thick plastic or glass containers sealed airtight. For multi-year storage do not use thin plastic containers, such as milk jugs, which in time often develop leaks.
Book Page: 71
Any household bleach solution, such as Clorox, that contains sodium hypochlorite as its only active ingredient may be used as a source of chlorine for disinfecting. The amount of sodium hypochlorite, usually 5.25%, is printed on the label. (In recent years, perhaps as a precaution against drinking undiluted chlorine bleach solution, some household bleach containers show a warning such as “Not For Personal Use.” This warning can be safely disregarded if the label states that the bleach contains only sodium hypochlorite as its active ingredient, and if only the small quantities specified in these and other instructions are used to disinfect water.) Add 1 scant teaspoonful to each 10 gallons of clear water, and stir. Add 2 scant teaspoonfuls if the water is muddy or colored. Wait at least 30 minutes before drinking, to allow enough time for the chlorine to kill all the microorganisms.24 Properly disinfected water should have a slight chlorine odor.
To disinfect small quantities of water, put 2 drops of household bleach containing 5.25% sodium hypochlorite in each quart of clearwater. Use 4 drops if the water is muddy or colored.24 If a dropper is not available, use a spoon and a square-ended strip of paper or thin cloth about 1/4 inch wide by 2 inches long. Put the strip in the spoon with an end hanging down about 2 inch beyond the end of the spoon. Then when bleach is placed in the spoon and the spoon is carefully tipped, drops the size of those from a medicine dropper will drip off the end of the strip.
As a second choice, 2% tincture of iodine can be used. Add 5 drops to each quart of clear water, and let stand 30 minutes.24 If the water is cloudy, add 10 drops to each quart. Commercial water purification tablets should be used as directed.
If neither safe water nor chemicals for disinfecting it are available during a crisis, store plenty of the best water at hand even muddy river water. Most mud settles to the bottom in a few days; even in a crowded shelter ways often could be found to boil water. Bringing water to a boil for one minute kills all types of disease-causing bacteria.24 Boiling for 10 to 20 minutes is required to kill some rarer infective organisms.
SOURCES OF WATER IN FALLOUT AREAS
Survivors of a nuclear attack should realize that neither fallout particles nor dissolved radioactive elements or compounds can be removed from water by chemical disinfection or boiling. Therefore, water should be obtained from the least radioactive sources available. Before a supply of stored drinking water has been exhausted, other sources should be located. The main water sources are given below, with the safest source listed first and the other sources listed in decreasing order of safety.
1. Water from deep wells and from water tanks and covered reservoirs into which no fallout particles or fallout-contaminated water has been introduced. (Caution: Although most spring water would be safe, some spring water is surface water that has flowed into and through underground channels without having been filtered.)
2. Water from covered seepage pits or shallow, hand-dug wells. This water is usually safe IF fallout or fallout-contaminated surface water has been prevented from entering by the use of waterproof coverings and by waterproofing the surrounding ground to keep water from running down outside the well casing. Figure 8.9 is taken from a Chinese civil defense manual.21 It shows a well dug to obtain safe water from a fallout contaminated source. If the earth is not sandy, gravelly, or too porous, filtration through earth is very effective.
3. Contaminated water from deep lakes. Water from a deep lake would be much less contaminated by dissolved radioactive material and fallout particles than water from a shallow pond would be, if both had the same amount of fallout per square foot of surface area deposited in them. Furthermore, fallout particles settle to the bottom more rapidly in deep lakes than in shallow ponds, which are agitated more by wind.
4. Contaminated water from shallow ponds and other shallow, still water.
5. Contaminated water from streams, which would be especially dangerous ifthe stream is muddy from the first heavy rains after fallout is deposited.
(Illustration)Fig. 8.9. A water-filtering well.This Chinese drawing specifies that this well should be dug 5 to 10 meters (roughly 5 to 10 yards) from a pond or stream.

Book Page: 72
The first runoff will contain most of the radioactive material that can be dissolved from fallout particles deposited on the drainage area.25 Runoff after the first few heavy rains following the deposit of fallout is not likely to contain much dissolved radioactive material, or fallout.
6. Water collected from fallout-contaminated roofs. This would contain more fallout particles than would the runoff from the ground.
7. Water obtained by melting snow that has fallen through air containing fallout particles, or from snow lying on the ground onto which fallout has fallen. Avoid using such water for drinking or cooking, if possible.
WATER FROM WELLS
The wells of farms and rural homes would be the best sources of water for millions of survivors. Following a massive nuclear attack, the electric pumps and the pipes in wells usually would be useless. Electric power in most areas would be eliminated by the effects of electromagnetic pulse (EM P) from high-altitude bursts and by the effects of blast and fire on power stations, transformers, and transmission lines. However, enough people would know how to remove these pipes and pumps from wells so that bail- cans could be used to reach water and bring up enough for drinking and basic hygiene.
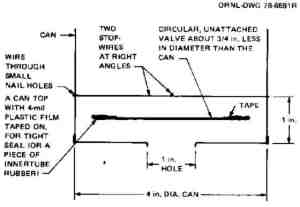
Fig. 8.10. Lower part of an expedient bail-can. The unattached, “caged” valve can be made of a material that does not have the springiness of soft rubber. ORNL-DWO 78-6691R (Illustration)

How to make a simple bail-can is illustrated in Fig. 8.10. An ordinary large fruit-juice can will serve, if its diameter is at least 1 inch smaller than the diameter of the well-casing pipe. A hole about 1 inch in diameter should be cut in the center of the can’s bottom. The hole should be cut from the inside of the can: this keeps the inside of the bottom smooth, so it will serve as a smooth seat for a practically watertight valve. To cut the hole, stand the can on a flat wood surface and press down repeatedly with the point of a sheath knife, a butcher knife, or a sharpened screwdriver.
The best material for the circular, unattached valve shown in Fig. 8.10 is soft rubber, smooth and thin, such as inner-tube rubber. Alternately, the lid of a can about 3/4 inch smaller in diameter than the bail- can may be used, with several thicknesses of plastic film taped to its smooth lower side. Plastic film about 4 mils thick is best. The bail (handle) of a bail-can should be made of wire, with a loop at the top to which a rope or strong cord should be attached.
Filling-time can be reduced by taping half-apound of rocks or metal to the bottom of the bail-can.
REMOVING FALLOUT PARTICLES AND DISSOLVED RADIOACTIVE MATERIAL FROM WATER
The dangers from drinking fallout contaminated water could be greatly lessened by using expedient settling and filtration methods to remove fallout particles and most of the dissolved radioactive material. Fortunately, in areas of heavy fallout, less than 2% of the radioactivity of the fallout particles contained in the water would become dissolved in water.25 If nearly all the radioactive fallout particles could be removed by filtering or settling methods, few casualties would be likely to result from drinking and cooking with most fallout- contaminated watr.
° Filtering
Filtering through earth removes essentially all of the fallout particles and more of the dissolved radioactive material than does boiling-water distillation, a generally impractical purification method that does not eliminate dangerous radioactive iodines. Earth filters are also more effective in removing radioactive iodines than are ordinary ion-exchange water softeners or charcoal filters. In areas of heavy fallout, about 99% of the radioactivity in water could be removed by filtering it through ordinary earth. 73
Fig. 8.11. Expedient filter to remove radioactivity from water. ORNL DWG 77-18431 (Illustration)

To make the simple, effective filter shown in Fig. 8.11, the only materials needed are those found in and around the home. This expedient filter can be built easily by proceeding as follows:
1. Perforate the bottom of a 5-gallon can, a large bucket, a watertight wastebasket, or a similar container with about a dozen nail holes. Punch the holes from the bottom upward, staying within about 2 inches of the center.
2. Place a layer about 1 inches thick of washed pebbles or small stones on the bottom of the can. If pebbles are not available, twisted coat-hanger wires or small sticks can be used.
3. Cover the pebbles with one thickness of terrycloth towel, burlap sackcloth, or other quite porous cloth. Cut the cloth in a roughly circular shape about 3 inches larger than the diameter of the can.
4. Take soil containing some clay almost any soil will do from at least 4 inches below the surface of the ground. (Nearly all fallout particles remain near the surface except after deposition on sand or gravel.)
5. Pulverize the soil, then gently press it in layers over the cloth that covers the pebbles, so that the cloth is held snugly against the sides of the can. Do not use pure clay (not porous enough) or sand (too porous). The soil in the can should be 6 to 7 inches thick.
6. Completely cover the surface of the soil layer with one thickness of fabric as porous as a bath towel. This is to keep the soil from being eroded as water is poured into the filtering can. The cloth also will remove some of the particles from the water. A dozen small stones placed on the cloth near its edges will secure it adequately.
7. Support the filter can on rods or sticks placed across the top of a container that is larger in diameter than the filter can. (A dishpan will do.)
The contaminated water should be poured into the filter can, preferably after allowing it to settle as described below. The filtered water should be disinfected by one of the previously described methods.
If the 6 or 7 inches of filtering soil is a sandy clay loam, the filter initially will deliver about 6 quarts of clear water per hour. (If the filtration rate is faster than about 1 quart in 10 minutes, remove the upper fabric and recompress the soil.) After several hours, the rate will be reduced to about 2 quarts per hour.
When the filtering rate becomes too slow, it can be increased by removing and rinsing the surface fabric, removing about 1 inch of soil, and then replacing the fabric. The life of a filter is extended and its efficiency increased if muddy water is first allowed to settle for several hours in a separate container, as described below. After about 50 quarts have been filtered, rebuild the filter by replacing the used soil with fresh soil.
° Settling
Settling is one of the easiest methods to remove most fallout particles from water. Furthermore, if the water to be used is muddy or murky, settling it before filtering will extend the life of the filter. The procedure is as follows:
1. Fill a bucket or other deep container three quarters full of the contaminated water.
2. Dig pulverized clay or clayey soil from a depth of four or more inches below ground surface, and stir it into the water. Use about a 1-inch depth of dry clay or dry clayey soil for every 4-inch depth of water. Stir until practically all the clay particles are suspended in the water.
Book Page: 74
3. Let the clay settle for at least 6 hours. The settling clay particles will carry most of the suspended fallout particles to the bottom and cover them.
4. Carefully dip out or siphon the clear water, and disinfect it.
° Settling and Filtering
Although dissolved radioactive material usually is only a minor danger in fallout-contaminated water, it is safest to filter even the clear water produced by settling, if an earth filter is available. Finally as always the water should be disinfected.
POST-FALLOUT REPLENISHMENT OF STORED WATER
When fallout decays enough to permit shelter occupants to go out of their shelters for short periods, they should try to replenish their stored water. An enemy may make scattered nuclear strikes for weeks after an initial massive attack. Some survivors may be forced back into their shelters by the resultant fallout. Therefore, all available water containers should be used to store the least contaminated water within reach. Even without filtering, water collected and stored shortly after the occurrence of fallout will become increasingly safer with time, due particularly to the rapid decay of radioactive iodines. These would be the most dangerous contaminants of water during the first few weeks after an attack.
Copyright (c) 1986 by Cresson H. Kearny. The copyrighted material may be reproduced without obtaining permission from anyone, provided: (1) all copyrighted material is reproduced full-scale (except for microfiche reproductions), and (2) the part of this copyright notice within quotation marks is printed along with the copyrighted material.”